Friday, June 29, 2012

Spicy Pizza Sauce


I made this delicious spicy pizza sauce from scratch for Brandon's birthday pizza.  I kinda just went for it and it turned out really good... I don't have exact measurements of what I put in... but I will list the ingredients and basic idea... Next time I might add some tomato paste but I didn't have any on hand so I just used canned diced tomatoes...

First, I heated some oil and butter and added some diced up anchovies (only 3 or so) which I mashed up with a wooden spoon to form a kind of paste...


OK that is a kinda nasty looking picture... but it is also cool looking... very rustic country kitchen, no?  I promise... it will get prettier after this...

Then I diced up some onion, celery, and some Anaheim chili that I had on hand (a relatively mild chili - a jalepeno would be good too...)


I sauted those until soft and then added the diced tomatoes (I drained the juice and reserved it)


Then I added some sweet paprika, garlic powder, dried basil, salt and pepper, a generous amount of hot pepper flakes, and a bay leaf.  I let it simmer over very low heat for about an hour and a half, occasionally adding some of the reserved juice from the tomatoes, and when that ran out, some water, as the tomatoes cooked down.  When it tasted good and ready I pureed it in the food processor.  YUM!

Spred it on your favorite pizza dough, top with cheese and any other toppings.  I used a great dough recipe - you can find it here.

Here is the pizza after it came out of the oven:


Delish!

Thursday, June 28, 2012

Birthday Feasting

Yes it was a FEAST!  I cooked and baked and rolled and stirred and whisked and floured and let rise and painted and spread and sprinkled and diced and chopped and squeezed and stirred and served! It was a day filled with verbs...

First we sat and ate guacamole at our new picnic table, and then had Anya's homemade pizza (I mean really really homemade... pizza sauce, dough.... OK, OK I did not make the cheese or the pepperoni but even I have my limits OK?)... and then of course,  blueberry pie for dessert.  Let's just look at the food OK?!


Guacamole secret ingredient?  SOUR CREAM! Shhhhh!  Also in there: minced garlic, jalepeno, cilantro, lime, salt, cayenne...


The picnic table (... Brandon is just sitting down... I think...?)


And then the pizza...


The dough was really really good!  I tried a new recipe I found at allrecipes.com and makes a crust that is crunchy on the outside but still soft and chewy in the middle... it made enough dough for 2 good size pizzas.  The recipe is available here.

Now for a variety of toppings... (yes that is homemade pizza sauce!)


Building pizza numero uno...

A little oil...


Spreading some homemade super spicy pizza sauce...


Cheese please...


Pepperoni...


Some black olives...


Funghi... my fav...


Jalepenos... (this was some spicy pizza!)


Slid it onto the preheated pizza stone...


15 minutes later...


A piece for me please?


YUM.  That was the b'day boy's pizza.

But we had enough dough for another one... (although not quite enough sauce... :(... )


We had some leftover grilled chicken from Saratoga... it was smoky and delicious... I threw it on there...


Cheeeeeeseee


Peppers and shrooms...


Jalepenos and some leftover proscuitto...


Cooked it up..


Yes... let's eat this too...


A happy chef...


OK so we couldn't really do that much damage... but we tried... and we have more than a whole pizza to eat another night... not too shabby!

Wait! Let's look at the pie real quick...

Mmmm blueberries... sugar... flour...


Yes... that is butter...


Pretty!


YUM.

OK so we vegged out.... a bit... I took pains not to think about (or mention) the calories... I hit the gym hard today... and I am resisting pie as we speak... that will last about 5 more minutes... literally... Rachel Maddow is telling us about the health care decision... I think this is all the more reason for PIE!

Find my pizza sauce recipe and the blueberry pie recipe under my recipes page... they will be there soon!

I will leave you with this family pic... a bed for each of our kids...


They. are. ridiculous.

-- Anya


Wednesday, June 27, 2012

The Sourdough Chronicles - The First Great Success!

Welcome back to The Sourdough Chronicles.  I promised to update you on the first loaf using the true old-school sourdough starter.  (That's the one that started as a blob...


...but came alive, started producing bubbles, and was, as I hoped, smelling sour and doubling in size after a week...


...).  I followed a no knead sourdough recipe I found online here.   It turned out amazing! 


It was dense and sour, but not too sour, and the crust was crusty and YUM.  OK so here are step by step pics.  By the way, this whole process takes anywhere from 20 to 24 hours so plan accordingly. 

Ingredients:

1 cup sourdough starter
6 cups bread flour
3 cups water
2 tsp. salt
1/4 tsp. active dry yeast (i am not sure this is necessary and probably will not use it next time).

Instructions:

1.  Combine 2 cups room temp water and sourdough starter


2. Whisk it up... aerate it a LOT!


3.  Add 1/4 tsp yeast (if using), and 3 cups flour... stir it up!


4.  Add remaining water (1 cup) and salt (2 tsp.) and... yeah, you got it.. stir it up again!


5.  Add last 3 cups flour, STIR IT UP!


6.  Cover loosely with a kitchen towel and leave in a draft free place for 12-15 hours.  (Make sure this is a REALLY REALLY BIG BOWL!  It will double in size)


7.  Check on it occasionally - it should be bubbly and BIG.  Bubbles should not be popping so catch it before that starts to happen.  It will look like this:


8.  Cover your hands in flour, and turn the dough out onto a well-floured surface... this will take several hand dips in the flour bowl and some maneuvering.  Tuck in edges to make it round.


9.  Wash out the bowl.  This part SUCKS.  A good trick is to use a plastic card you don't need (like a membership card you don't use)(mine is from Micheal's Arts and Crafts :)) and scrape the dough off the bowl.  It will destroy any sponge.  Beware.

10.  Put a little oil in the bowl and gently lift the dough back in.


11.  Time for the second rise.  This could be anywhere from 2 to 5 hours depending on the environment and temperature in your kitchen.  It should double in size but be careful that the dough doesn't start collapsing in on itself.  It took about 3 hours in my kitchen in summer.  It will look like this:


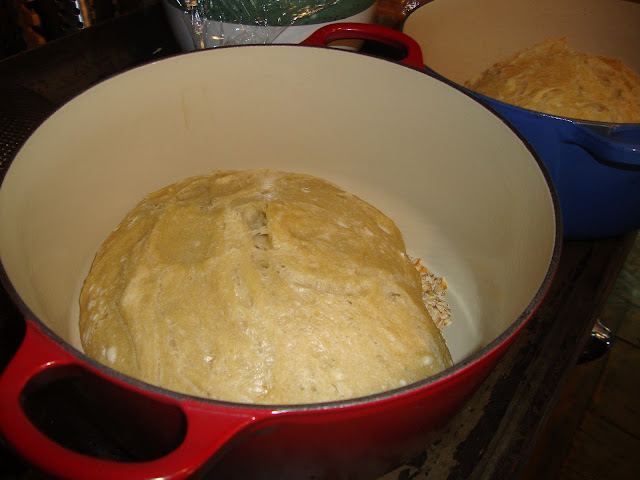
12.  A half hour before the dough is ready, preheat your oven, and whatever you will be using to bake the bread, at 450 degrees.  I split the dough in half (I highly recommend doing this, unless you want a really large loaf) and used two dutch ovens that were 4.5 and 5.5 quarts in size. Make sure you have a cover.

13.  Remove the preheated dutch ovens from the oven (BE CAREFUL!  HOT!!). Sprinkle some cornmeal or oatmeal (I used oatmeal and it gave a nice crunch to the bottom) in the bottom of the pan.  Carefully turn the dough into the pots.  Cover and cook for 30 minutes.  Remove the lid and cook another 15 minutes or so until the bread is a nice brown color and sounds hollow when you knock on the bottom. 

Voila! Let cool if you can resist cutting in.  Be generous with the butter people!  Or cheese! Or oil and vinegar!  Just eat it.

Enjoy!  Stay tuned for the next issue of The Sourdough Chronicles where I will try using a slightly different recipe.